
How to Install GlitchTip on Ubuntu 18.04
GlitchTip is an application that helps you to track your application's uptime (up-time monitoring) and crashes. After developing your application and releasing it to the world, GlitchTip enables you to keep track of events that happen as people use your application.


Rex Anthony
GlitchTip is an application that helps you to track your application's uptime (up-time monitoring) and crashes.
After developing your application and releasing it to the world, GlitchTip enables you to keep track of events that happen as people use your application.
If an error occurs when a user is using your application, information about the error is sent to your GlitchTip deployment. This enables you to spot errors very quickly and take action to fix the error before more people experience that issue.
Rather than depending on your users submitting bug reports, you can quickly know the instant that an error is triggered by someone using your application.
What is GlitchTip?
GlitchTip is an open-source re-implementation of the Sentry error tracking platform.
But unlike sentry, it is free to use.
You can set up and deploy it on your own VPS server. As we are going to do later on in this article.
After setting up the error tracking application, you need to insert some code into your application to send errors to your GlitchTip deployment. These are called SDKs.
GlitchTip currently has SDKs for applications created with the following technologies
- C#
- Cordova
- Electron
- Elixir
- Go
- Java
- Javascript
- Minidump
- Native (C/C++)
- Node.js
- Objective-C
- PHP
- Python
- React-Native
- Ruby
- Rust
You can check out the full SDK documentation here.
You can have one GlitchTip deployment and have multiple applications sending error reports to it.
Install GlitchTip on Ubuntu 18.04
In this tutorial, we are going to be deploying GlitchTip on docker on an AWS VPS running a Ubuntu 18.04 server.
Requirements
Before you get started, please install
- Docker
- Docker-compose
Get the docker-compose file
Create a directory in your root directory
$ cd ~
$ mkdir glitchtip
$ cd glitchtip
Next, create a file called “docker-compose.yml” in the current directory. I will be using nano which comes as a default in my server, you can also use vim
$ nano docker-compose.yml
In this file, copy and paste the docker-compose commands from here. It looks like this at the time of writing this article
version: "3.4"
x-environment:
&default-environment
DATABASE_URL: postgres://postgres:postgres@postgres:5432/postgres
SECRET_KEY: change_me
PORT: 8000
x-depends_on:
&default-depends_on
- postgres
- redisservices:
postgres:
image: postgres:13
environment:
POSTGRES_HOST_AUTH_METHOD: "trust"
restart: unless-stopped
redis:
image: redis
restart: unless-stopped
web:
image: glitchtip/glitchtip
depends_on: *default-depends_on
ports:
- "8000:8000"
environment: *default-environment
restart: unless-stopped
worker:
image: glitchtip/glitchtip
command: ./bin/run-celery-with-beat.sh
depends_on: *default-depends_on
environment: *default-environment
restart: unless-stopped
migrate:
image: glitchtip/glitchtip
depends_on: *default-depends_on
command: "./manage.py migrate"
environment: *default-environment
On line 5, endeavor to change your SECRET_KEY to something more secure.Also under the x-environment section at the top of the file, you can add more environment variables to GlitchTip such as GLITCHTIP_MAX_EVENT_LIFE_DAYS, REDIS_URL, DATABASE_URL and others.
Check out the list of environment variables here, under the Configurations subheading.
For our case, we will leave it as it is.
Next, save the file and type
$ docker-compose up -d
to create the application at port 8000.
Open your browser and go to your_ip_address:8000. You should see the GlitchTip login screen

Click on signup to register

After logging in, you will be taken to the dashboard where you can create an organization

Click on Create New Organization

Enter the name of your organization. I used “Rex Org” for mine.
After that is done, proceed and you will be taken to the organization screen where you can manage your projects for this organization

As you can see, there are no projects, so let us create a new project for our simple node.js application. Note that you can create a project for any type of application as I have listed in the SDKs above.
Next, click on “Create New Project”.

Select the type of application that you want to monitor. In our case, we select Node.js
Next, enter the name of your application in Project Name and click on create a team where you can specify a slug for your team. In my case, I used rex-team it as my team slug.
Finally, click on the Create Project button.
After the project is created, you will be taken to a screen that explains to you how to set up your application to start using GlitchTip as a monitoring system. In our case, we are using Node.js so it looks like this
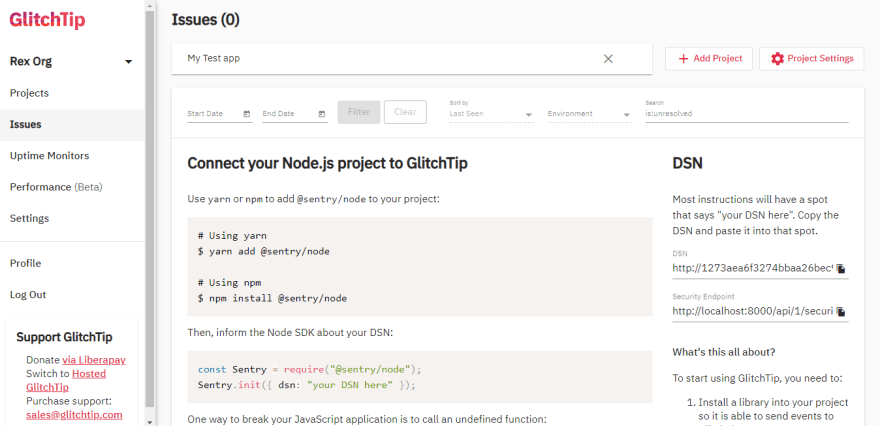
Notice that we are now in the issues tab. Note the right-hand side of the screen that shows a DSN link. We will need to use it in your application to send bug reports automatically whenever they happen to our GlitchTip deployment.
For now, we have our GlitchTip project setup and ready to listen for errors from our application.
Create a simple Node.js app and connect it with GlitchTip
Let us proceed with setting up a simple node.js app and adding an intentional error to see if it gets tracked by GlitchTip.
Go back to the terminal and head back to your home directory, make sure that you have node and npm already installed.
$ cd ~
$ mkdir app
$ cd app
$ npm init -y
We have created a directory called app, which we entered into the directory and initialized this directory as a node.js directory for our application. We will now have a package.json file automatically created for us.
Next, we are going to install 2 dependencies
- express
- @sentry/node
$ npm install --save express "@sentry/node"
This will install an express server and a GlitchTip SDK for our node app which we will use to send error reports to our GlitchTip deployment.
After everything is installed successfully, our package.json file will be automatically updated with our dependencies
Next, create a file in the ~/app/ directory called index.js.
$ nano index.js
In this file, we create 2 simple express routes. One with an error and another without an error. We also copy and paste our DSN URL from our GlitchTip deployment to track for errors from our application.
Paste the following code into your index.js file
const express = require('express');
const app = express();app.get("/", (req, res) => {
res.json({ status: "success", message: "This is a GlitchTip test app" });
});const port = process.env.PORT || 3000;
app.listen(port, () => { console.log(`Listening on port ${port}`); });
Save the file and in your terminal type node index.js. You will get the following response Listening on port 3000.
Open your browser and go to http://your_ip_address:3000. You should see the following output
{
"status": "success",
"message": "This is a GlitchTip test app"
}
This means that your app is working fine.
Next, we are going to set up this simple app to fail on purpose and send that error to GlitchTip.
Edit your index.js file and update it with the following code
const express = require('express');
const Sentry = require("@sentry/node");
Sentry.init({ dsn: "http://1273aea6f3274bbaa26bec9e6d7ad511@localhost:8000/1" });const app = express();app.use(Sentry.Handlers.requestHandler());app.get("/", (req, res) => {
res.json({ status: "success", message: "This is a GlitchTip test app" });
});app.get("/error", (req, res) => {
throw new Error("My first GlitchTip error!");
});app.use(Sentry.Handlers.errorHandler());const port = process.env.PORT || 3000;
app.listen(port, () => { console.log(`Listening on port ${port}`); });
We now have a route that throws an error when we visit the http://your_ip_address:3000/error endpoint.
Run the app again with node index.js and open your browser and visit the link http://your_ip_address:3000/error.
You should see that an error is thrown

Next, go back to our GlitchTip deployment and refresh the page.

You will now be able to see the error displayed in the issues tab.
That’s it. You have now successfully integrated GlitchTip as a monitoring system for your application.
You can click on an error to inspect it and get information about how the error originated with a stack trace just as I have below

You can track when the error occurred, how many times it has been reported, the last time it was reported and more information about the error such as the header data sent, node version, and so on.
In addition to error tracking, you can also perform uptime monitoring with GlitchTip. It will occasionally send a ping to your application to keep track of its availability so that when your application stops working you can receive a notification and take action quickly.
Upvote
Rex Anthony
Rex is a content creator and he is the founder at sharetxt.live. He writes articles about file sharing, content creation, and productivity.

Related Articles